Saturday, 28 May 2016

Repurposing old jeans


Sometimes we want something that isn’t available anywhere, so how do we get that. The answer is simple – make it yourself. But what if you have never made anything yourself? So it’s time to learn then.
I purchased linen trousers sometime ago but unfortunately fabric wasn’t of the best quality.  I wore them once and the fabric next to back seam has split. I mended it and it’s split again. I was so upset, new trousers absolutely impossible to wear and I feel sorry to bin them.
I was thinking what could I do with them, probably repurpose somehow. Then I decided to turn them into a skirt. 
We all have seen those skirts made from trousers and I don’t like that "trouskirt" idea. So I came up with proper skirt idea, and to make it more "skity" I decided to add some lace to it.
It was difficult to find lace that would match the style of skirt and a fabric  and would be of necessary width and pattern. So I decided to make one.

I started from cutting off the legs and uraveling all the seams

 
 Ironed on all the pieces and folded along the lengh

 Placed all 4 folded pieces on top pf each other and marked the centre


 Cut them in half to make 8 panels
 Measured hips and devided to 8 + 2cm seam allowance, in my case it is 18cm (top of the panel)

 Bottom of the panel made as wide as fabric permitted
 cuted first panel and used it as a guide to cut the restof the panels

 That was my mistake when unraveled the seams i was rushing and cut into fabric, so be careful not to repeat my mistakes. I mended the cut with zigzag or it can be covered with some applique
 Placed panel guide on to second piece  and cuted accordingly
 Did so for the rest of the panels
 Now it's time to sew panels into skirt. I used serger to assemble the panels, but zigzag will do too

 Next step was attaching the panels to the skirt top
 Tip: for plus size skirts you can see the fron part is shorter than the bottom, do not worry, after the skirt is finished this will look even, not like majority of hight street skirts are shorter at the back.
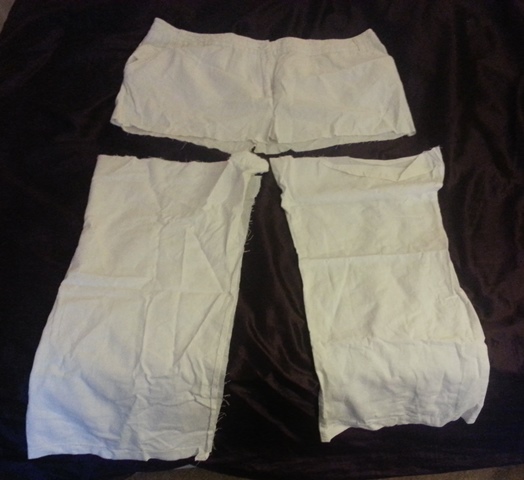
Here we go, skirt is ready and it can go like this, but I wanted to make it prettier so decided to add lace.
I left the hem just overlocked, but here many options available:, heming, adding lace or ribbons, ect
 Then I crocheted lase and attached it to the joining seam of the top and panels


Here we go. My skirt is ready


My new skirt


I am happy with my new skirt and got the bug for it, so next one followed immediately

Same technology, Old jeans, some lace, ribbons...

Cut the top off and unravel leg seams. Ironing is crusial to make panels straight.


 Fold the pieces in half and cut


 Then measure hips and devide into 8 + seam allowance


Cut the panels 


Sew the panels same way and attach to the top of the skirt


 Add lace ot ribbons ect to your liking


Monday, 23 November 2015

How to finish neck opening

I found somewhere on internet questions on how to finish neck opening on crepe satin dress...

I was actually making one for myself and decided to take step by step pictures along my work.
I hope it will be usefull to someone who struggles with finishing neck opening... And same technique is good for other fabrics too.

First of all I cut the front and back neck facing and very fine iron-on interfacing repeating the actual neck openinghy about 4cm wide.

I layed pieces on iterfacing close to each other in order to save interfacing, I did not notice much difference what way you lay pieces on interfacing as after ironing you will not notice anything
Just remember for soft fabrics interfacing should be even softer and finer


 Iron on the interfacing

 I have 2pics for back facing, sew them together face to face
 I use pins to keep pieces in place...
 ... and take the pins out when sewing. I used to keep pins in and sew through them but sometimes needle hits the pin and breaks so I pull pin out just before needle sew through


 Checking the facing
 pin front and back facing together good sides in


 pin facing to the neck
 Leave the sides open

 sew fron and back facing to the neck good sides in


 this is how it should look facing attached to the neck
 pin slids together and sew


 open the seam and iron
 finish attaching the facing to the neck


 trim the edge

 slid the corner
 slid the round area few times for better adjustment
 turn the facing back and iron. Hand sew the edge of the facing to the bad side of the dress and iron again
 finished dress